
A roll-in shower is a curbless, fully accessible shower that a person can enter in a wheelchair or shower chair without stepping over anything. Installing one means more than removing a tub. The floor has to slope to a drain, the membrane under the tile has to be continuous, and the walls have to be ready for grab bars. In-Trend Home Solutions designs and builds barrier-free bathrooms in the Greater Toronto Area and Southwestern Ontario, and this guide walks through what the work involves so you can plan it properly and judge a quote.
TL;DR
- A roll-in shower should be at least 1,525 × 1,525 mm (60 × 60 in.) according to CMHC’s accessible bathroom guide. Public design standards set a minimum of 1,500 × 900 mm.
- The floor needs a gentle, continuous slope to the drain, and the threshold must be level or no more than 13 mm high.
- The waterproofing and the floor structure decide whether the shower lasts. Both are built before any tile goes down.
- Blocking in the walls for grab bars is far easier during the build than afterwards.
- Permits, design and sequencing are part of the job. Settle them before demolition.
Table of Contents
- What a roll-in shower is and why people choose it
- How big a roll-in shower needs to be
- Features the shower should include
- Roll-in shower installation, step by step
- Permits and code for a house in Ontario
- What affects the price
- Who should do the installation
- Planning a roll-in shower with In-Trend Home Solutions
- Questions homeowners ask
- Sources
What a roll-in shower is and why people choose it
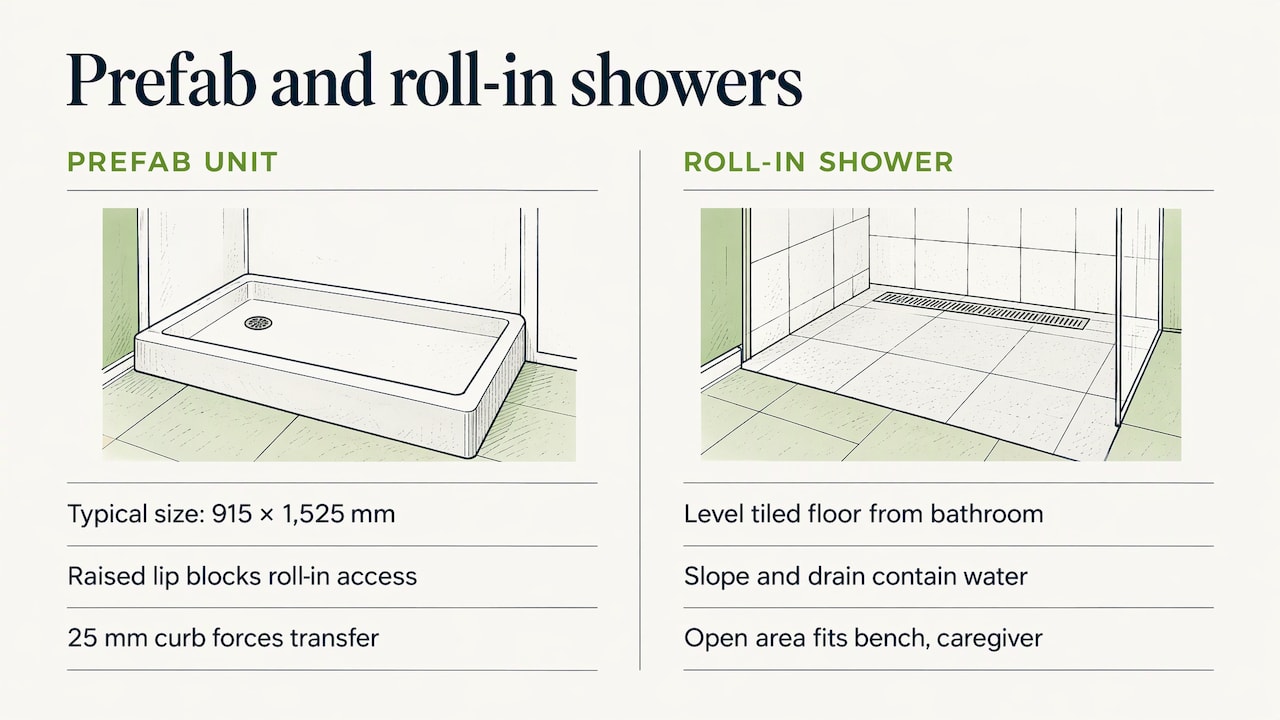
A standard prefabricated shower unit is usually 915 × 1,525 mm (36 × 60 in.) with a raised lip. CMHC points out that even a 25 mm (1 in.) curb forces a wheelchair user to transfer. A roll-in shower removes that step. The tiled floor runs straight from the bathroom into the shower, and water is kept in by slope, a drain and, where needed, a trench at the entrance.
The same guide calls the custom-built, curbless wheel-in shower the best design for accommodating as many people as possible. A wet room layout with a large open tiled area also leaves space for a caregiver and a shower bench or shower wheelchair. The City of Kingston’s accessibility standards add that a roll-in shower removes the hazard of tripping over a raised threshold. That benefits walker users and older adults as well as wheelchair users.
If you want to see the concept explained before you plan, our page on what a roll-in shower is covers it, and the benefits of roll-in showers for wheelchair users shows how they change daily routines.
How big a roll-in shower needs to be
Size is the first decision, because it determines whether the project is a simple conversion or a bathroom re-plan.
| Source | Shower size | Other requirements |
|---|---|---|
| CMHC, Renovating for Accessibility: Bathrooms | At least 1,525 × 1,525 mm (60 × 60 in.) | Controls no higher than 1,220 mm (48 in.); hand-held hose at least 1,525 mm (60 in.) |
| City of Kingston accessibility standards | At least 1,500 mm wide × 900 mm deep | Clear floor space at the entrance at least 900 mm deep and as wide as the shower; threshold level or bevelled, maximum 13 mm |
| Saskatchewan Barrier-Free Design guide (2026) | At least 1,500 mm wide × 900 mm deep | Slip-resistant floor; controls no higher than 1,200 mm; a 7 to 13 mm threshold bevelled no steeper than 1:2 |
The smaller figure is a minimum for a person who can manoeuvre with a little help. The larger CMHC figure gives room to turn a wheelchair and to place a bench and a helper. If you use a power chair, or a caregiver assists you, plan for the larger footprint.
The Saskatchewan guide points out that local residential requirements can differ, so the municipality and provincial code that apply to your address are what count.
On a typical Ontario house, a 60 × 60 in. shower usually means taking space from a tub, a closet or the room next door. That is why we begin with measurements and a home assessment rather than a product choice.
Features the shower should include
A roll-in shower is a system. These are the elements specified in the Canadian guidance above:
- Grab bars. Kingston’s standards call for a vertical bar at least 1,000 mm long on the side wall, and an L-shaped bar on the wall opposite the entrance with a 1,000 mm horizontal run mounted 750 to 870 mm above the floor and a 750 mm vertical run.
- Hand-held shower. CMHC recommends a hose at least 1,525 mm (60 in.) long and controls no higher than 1,220 mm.
- Seat. A folding seat or a fixed bench. Both guides name it as a common feature.
- Slip-resistant floor. Required by the public standards, and sensible in any home.
- Drain and slope. CMHC recommends the drain be placed to the side and notes that a linear trench drain lets the whole floor be evenly sloped, which is easier to roll over than a floor that dips toward a central round drain.
For a closer look at layouts, see our accessible bathroom designs and the six upgrades from toilet to roll-in shower.
Roll-in shower installation, step by step
This is the sequence a well-run conversion follows. At each stage we note what goes wrong when it is rushed.
1. Assess the room and the person
Measure the bathroom, the doorway and the approach to it. Note the transfer method, the chair or walker dimensions and whether a caregiver will be present. Decisions about shower size, seat type and bar placement come from this, not from a catalogue. We offer home assessment reports and consulting for exactly this stage.
2. Settle design and permits
A layout that moves plumbing, changes the floor structure or widens a doorway can involve permits and drawings. Our team handles permits and design planning, so the plan is approved before demolition rather than discovered halfway through. The permit section below explains what the Ontario Building Code says.
3. Demolish and open the floor
The old tub or shower is removed and the subfloor is exposed. This is when hidden problems show up: rot, uneven joists, old plumbing. Finding them now is cheaper than finding them after tile.
4. Build the slope into the floor
A curbless shower needs the shower floor lower than the bathroom floor, or a sloped floor that blends into it. In a wood-frame home that often means lowering the framing or building up the bathroom side. It is the most structural part of the job and the one that most affects cost. The finish slope toward the drain is small: Kingston’s standards give a maximum of 1:100 (1%) for positive drainage, and the Saskatchewan guide says a threshold of 7 to 13 mm must be bevelled. Whatever the target, the floor must drain by gravity and have no low spots where water sits.
5. Reinforce the walls
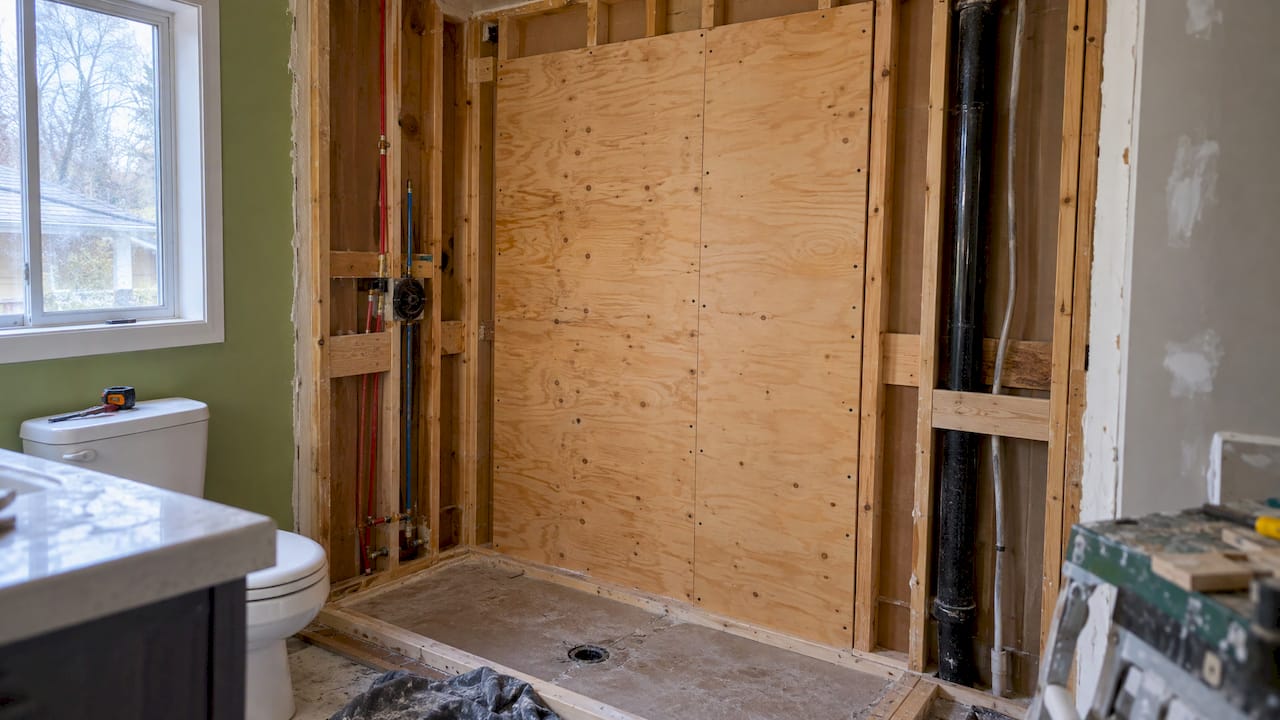
CMHC recommends framing all bathroom walls and the ceiling with 19 mm (¾ in.) plywood from floor to ceiling, so that grab bars, handrails and even a ceiling lift can be fixed securely now or later. It is an inexpensive step while the walls are open. A grab bar screwed into drywall alone is a safety risk.
6. Install the drain and waterproofing
This is the stage that decides whether the shower is still dry in ten years. The membrane must cover the entire floor and run up the walls as one continuous layer, with the drain connected to it and every corner and seam treated. Following the manufacturer’s instructions for the membrane and drain system matters here, because systems differ. A flood test before tiling, with the floor filled with water and left to hold it, is the standard way to confirm the work. Photograph the membrane before it is covered.
7. Tile, set the trench or water dam and fit the fixtures
Tile is laid on the sloped substrate. Use a slip-resistant finish on the floor. If the layout needs help keeping water in, CMHC notes that a flexible 25 mm water dam can be fixed to the floor at the entrance and flattens when it is stepped or wheeled on. Then the grab bars, seat, hand-held shower and controls are installed at the heights listed above.
8. Test, clean and walk through
Run the shower, check the drainage and confirm that bars are firm and controls are reachable from the seat. A tidy hand-over matters in a home where someone may need to use the bathroom the same day.
Permits and code for a house in Ontario
The 2024 Ontario Building Code includes Article 3.8.3.13, which requires at least one universal dressing and shower room where showering facilities are provided. New permit applications follow the 2024 code from April 1, 2025. According to a City of Brampton summary of the changes, detached houses and certain other housing types are exceptions to the barrier-free application requirements.
That does not mean a house renovation needs no paperwork. Moving plumbing, altering structure or changing the floor can still need a permit and inspection, and your municipality decides. This is why it belongs in the plan from the start. If you are not sure whether your project is covered, we can confirm it as part of the design stage.
What affects the price
We do not publish fixed prices for roll-in showers, because the range is wide and the drivers are specific to the house:
- Floor structure. Lowering or rebuilding the floor to get the slope is the largest variable.
- Size. A 1,525 × 1,525 mm shower takes more tile, membrane and framing than a 1,500 × 900 mm one.
- Drain type. A linear trench drain and its waterproofing details cost more than a standard point drain.
- Plumbing changes. Moving the drain, the supply lines or the toilet adds work.
- Doorway and wall changes. Widening an opening or relocating a wall brings in framing, electrical and sometimes permits.
- Finishes and fixtures. Folding seats, bars and shower systems are chosen to suit the user.
The most reliable figure is a written estimate for your bathroom after a site visit. Some Ontario municipalities run annual accessibility repair programs: the City of London’s Ontario Renovates program, for example, lists accessible shower stalls as eligible and requires written approval before any work starts. Check your municipality’s page for current intake periods before you commit to a start date.
Who should do the installation
A roll-in shower combines plumbing, carpentry, waterproofing and tile in a tight sequence, and the trades must hand off to each other without gaps. A single party accountable for the whole sequence prevents the usual failures: a slope that does not drain, a membrane cut by a later trade, bars fixed into nothing.
Our offer is general contracting with project management built in: thorough oversight, proactive communication and a strong emphasis on cleanliness and site preparation, so the house stays livable during the work. For background on choosing a builder, our guide to hiring a general contractor in Ontario lists what to ask.
You can also see what the finished work looks like in our bathroom project gallery and the accessible bathroom renovation stories from Niagara Falls.
Planning a roll-in shower with In-Trend Home Solutions
We design and build barrier-free bathrooms, ramps, lifts and widened doorways for homeowners in the Greater Toronto Area and Southwestern Ontario. For a roll-in shower, that means one team taking the project from assessment and permits through construction and clean-up, so you deal with one point of contact instead of coordinating trades yourself.

To discuss your bathroom, see our barrier-free bathroom and accessibility services or contact us for a renovation estimate.
Questions homeowners ask
Can any bathroom be converted to a roll-in shower?
Most can, but the room must be large enough for the shower and its entrance clearance. The floor structure and the position of the drain decide how much work the slope takes. A site assessment tells you whether the existing footprint works or whether you need to borrow space from a neighbouring room.
How big does a roll-in shower need to be?
Public accessibility standards in Canada set a minimum of 1,500 mm wide by 900 mm deep, with clear floor space at the entrance. CMHC recommends at least 1,525 × 1,525 mm (60 × 60 in.) for a wheel-in shower. Choose the larger size if you use a power chair or have a caregiver helping.
Do I need a permit to install a roll-in shower?
It depends on the scope and your municipality. Changes to plumbing, structure or the floor commonly need one, even though detached houses are exempt from some barrier-free provisions of the 2024 Ontario Building Code. We handle permit and design planning as part of the project.
Is a roll-in shower the same as a curbless or walk-in shower?
A roll-in shower is curbless, but not every curbless or walk-in shower is built for a wheelchair. A roll-in design has the size, entrance clearance, slope, grab bars and controls described above, so a person can enter, turn and bathe seated.
Sources
- CMHC, Renovating for Accessibility: Bathrooms
- City of Kingston, Built Environment Accessibility Design Standards
- Saskatchewan, Barrier-Free Design guide (2026)
- 2024 Ontario Building Code changes, accessibility updates (City of Brampton)
- City of London, Home Repair & Accessibility Funding